bloglightmag.com
  • Home
  • Design
  • Light
  • Resource
  • About Us
  • Guest Post
Home - Archives for Charles S. - Page 3
Author

Charles S.

Charles S.

I'm Charles S. Watts.I am an interior designer. At present, I have been engaged in this industry for nearly ten years and have a deep understanding of decoration design.Welcome to communication with each other.

Design

History Of LED Lighting

by Charles S. October 21, 2018
written by Charles S.

The history of L.E.D

1907: Henry Joseph Round discovers the physical effect of electroluminescence. But as he is working on a new radio direction finding method for marine vessels this discovery is initially forgotten. 1962: The first red luminescence diode, type GaAsP, is launched.

1971: LED in other colors are available: green, orange, yellow. There are continual improvements in the output and effectiveness of all LEDs.

1993: Highly efficient InGaN diodes emitting in the blue and green spectrum are demonstrated. The conditions for creating white light are met.

1995: The first LED with white light created by luminescence conversion is launched. In the last few years the efficacy of colored LED increased up to amazing 100 lm/W and more depending on the color and driving conditions. A trend which will proceed in the future.

As today’s white LED reach efficacies up to 40-100 lm/W (efficiency depends on color temperature and color rendering) – they are more and more used in general lighting. In emergency lighting as well as decorative lighting, they are already established in implementation area. Today, also applications such as illuminated advertising benefit from the advantages of LED, particularly by using colored LED-modules.  LED Definition A light-emitting diode (LED) is a semiconductor diode that emits incoherent narrow-spectrum light when electrically biased in the forward direction. Basic principles of LED (Light Emitting Diodes)

  • An LED consists of several layers of semiconducting material
  • When an LED is operated with DC voltage light is generated in the active layer
  • The generated light is radiated directly or by reflections
  • In contrast to lamps, which emit a continuous spectrum, an LED emits light in a certain color
  • The color of the light depends on the used material
  • Two systems of material (AllnGaP and InGaN) are used in order to produce LED with a high luminance in all colors from blue to red and also in white (luminescence conversion). Therefore different voltages are necessary in order to operate the diode in conducting direction 

The white LED To produce white light, the light of blue LEDs is passed through yellow phosphors. The composition of the phosphor determines the light color. The Chip Level Coating (CLC) process developed and patented by OSRAM ensures a degree of homogenity in the light produced that other processes cannot achieve. By selecting appropriate white LEDs, it is possible to offer LED systems with the same light colors as fluorescent lamps (Warm White, Neutral White and Daylight). Light Colors LEDs from Precision are available in the color temperature from 2700K to 15000K and Blue,Amber,Green,Pink,Purple,Red. 2700K-4500K =warm white(Same with OEM) 4500K-6500K= pure white(Neutral white) 6500k-8000K= Bluish White( Daylight)

Advantages of Precision LEDs

The Key element to the quality of LED chips.

Trough the lifetime of LED is long, it depends on various influencing factors. LEDs are geting hot An LED emits light but it hardly emits any UV or IR radiation; the emitted light is cold – illuminated objects are not exposed to heat. LED lighting is therefore ideal for illuminating sensitive objects – for example in museum or shops.
The LEDs themselves (and therefore the entire module) are heated up however by the process by which light is produced. This heat must be transported away from the LEDs.The life of an LED module depends on the temperature at which it is operated. The cooler, the higher the lifetime, the brighter the LEDs.

The free CSS cleaner allows you to organize your style sheets.
October 21, 2018 0 comment
0 FacebookTwitterPinterestEmail
Indoor Light

Everything You Need To Know About LED Christmas Lights

by Charles S. August 9, 2018
written by Charles S.

With Christmas having just gone by, it is nearly impossible that you missed seeing the LED Christmas lights that were on display as part of every festive decoration. From buntings across streets and shop fronts, wrapped merrily around Christmas trees and mangers, to drape across windows, these lights have become part of nearly every celebration today. Surely holidays would not feel like the holidays if they were not around. Read on to find out more about how LED works and also how the use of these lights helps the environment compared to other regular bulbs. Here we will also tell you the best way to store them so that they are as good as new when you want to use them in the next holiday season.

How LED Works

LED’s or Light Emitting Diodes are not only used in festive lights as you might assume, but they are also a part of almost every electronic device that has been manufactured in recent times. From remote controls, watches and clocks, microwaves and ovens to even the little light that shows when the power button is on for your camera. Yes, even something as small as that is powered in many cases by LED lights. Because of their small size, they can be fitted neatly into electronic devices no matter how tight the fit. And because they do not get heated and do not have a filament inside them like the regular bulbs, they last longer. And in some cases much longer than the appliance that contains them, which is a real miracle considering how small they are.

How the technology works is that it is based on the semiconductor diode. First introduced into modern practical appliances in 1962, they were only capable of emitting one kind of light. And that was a low red light that was used in the first electronic appliance made with this technology. Gradually however with developments in the field, the light emitted by a LED got brighter and now you can have them in almost every colour that you fancy.

How the LED works is that it consists of a piece that is semiconductable and is made to replicate what is called a p-n junction. This is one that is formed by p-type and n-type semiconductors when they are placed very close together. And when current flows through the chip, electrons and electron holes (the opposite of an electron) a difference in energy levels is created which then causes emission of light. By changing the manipulating the differences in the energy levels within the junction, different intensities of light and different colours can be created.

The Benefits Of Using LED Christmas Lights

When you pick LED Christmas lights over others, you know that you have picked something that is different from other kinds of lights and that will give you a better performance. You also know that they will last longer than the other variety. And this is what makes you pick them at the store. While in most cases you might not know the exact details of why you have made this choice, you will most certainly have heard about the benefits of LED lights versus the other types. And though it might just be a murmur, it is near impossible to have missed it in the electronic world.

Firstly LED Christmas lights need very little power to run; they have been designed that way. About 30-60 milliwatts of light is all they needed in the beginning and now most of them need only about one watt to run. If you were to make a comparison, they use about 90% less electricity than regular lights. And considering that you might want to have them on for prolonged durations of time during the holiday season, their use does make more economical sense. They are also highly efficient. But this we mean that they produce a larger amount of light per unit of power they consume than other varieties of lights. Because of the way they have been created they do not emit any heat. And this makes them ideal to be used near flammable materials as well as at close quarters to children.

The bulbs are also made of plastic and not of glass. This ensures that they do not break while you are putting them up or even if you put them in a box for storage. And you can use them both for indoor and outdoor displays without any hesitation. However, it helps to know that to obtain the maximum benefit from them; you should check with the store whether the ones you are purchasing are indoor or outdoor ones. There are minor differences in the two and they all have to do with durability.

You are more likely to be able to use your LED lights for several Christmases compared to other incandescent ones. And because the technology that is used to develop these lights has advanced to a large extent, the price of LED’s is also marginally low. You can buy a large size box for under $10 before the festive season begins, and after that you might even get it for a much lower price.

Once Christmas is over and you have taken off all the decorations, it helps to know how to best to store your LED Christmas lights. A simple cardboard box will do though you will need to make sure that it is large enough to fit in all the lights comfortably. If they are getting crushed then you might need to find another box. Store them like you would store any other decoration, keeping in mind how often you might like to use them. If you want to bring them out for Easter then you should keep them somewhere within easy reach.

Despite all the benefits of LED lights it is important to note that all the bulbs in a string need to be intact for the entire string to light up. While this is a disadvantage especially when you have to find which bulb in the string is the problematic one, they are very easy to unscrew and replace. Therefore buying extra bulbs when you make your initial purchase is always a good idea. In the end this is just a minor inconvenience compared to the hours of joy you will get once you finally have the LED Christmas lights up and running.

August 9, 2018 0 comment
0 FacebookTwitterPinterestEmail
Indoor Light

How to Make A Trellis to Create an Illusion of Space Step by Step

by Charles S. August 9, 2018
written by Charles S.

1. Drawing the design on the panes. Set two sawhorses about 4 feet apart to provide a steady base, and put the 3 ½ -by-8-foot plywood panel on them with its smoother side facing upward. Make tick marks denoting the ends of grid lines at 6-inch intervals around all four edges of the panel. Use a piece of chalk and the factory-cut edge of the remaining 8-foot-long strip of plywood as a straightedge to draw the grid lines with chalk. Then, using the scale drawing on Materials for A trellis to create an illusion of spaceas a guide, transfer the design onto the panel, beginning at the top with the tower design. Draw with a pencil to distinguish the lines of the design from those of the grid; to ensure correct line spacing, lay a piece of lath either 1 1/8 inches wide or 1 1/8 inches wide as appropriate in the position called for by the design, and draw lines on both sides of it.

2. Cutting out the tower pattern. Fit a saber saw with a ¼ -inch plywood blade (Tool for outdoor projects), and set the cutting edge of the blade against the upper pencil line four squares from the top at one side of the panel. While a helper holds the corner there to prevent the plywood from splitting, cut along the pencil lines delineating the outer edge of the tower stopping the saw and starting a new cut from an edge as necessary.

3. Cutting lath strips. One strip at a time, measure, mark, cut and nail the lath in the sequence indicated in Step 4, beginning with the 1 1/8 inch lath that will form parts of the outside frame of the trellis. To prevent the lath from splitting when cut, lay the piece flat in a miter box and push it against the far side, aligning your mark with the 90? slots of the box. Hold the lath tight and cut it with a backsaw. The drawings below indicate where horizontal strips butt against vertical ones and vice versa, and thus are a guide to the length of each strip. Add a little extra length to the diagonals so you can trim them easily in Step 5.

4. Nailing the lath. Follow the lettered sequence at right to nail the lath strips one at a time as you cut them (Step 3) to the panel and to one another with 7/8 inch galvanized-steel brads placed at the ends and at 6-inch intervals in between. First, attach the horizontal and vertical strips marking the outer edges of the trellis and tower, then those marking the inner edges (A). Attach the vertical strips within the trellis and the illusory door (B). Attach the horizontal strips of the door and illusory walkway (C). Attach the diagonal strips of the walkway. Trellis and tower (D). For a smooth finish at the top of the tower, nail 2 ½ -inch-long pieces of lath, called mounting blocks, onto the uppermost pair of horizontal strips where they meet the slightly angled tower sides. Finally, nail a second layer of lath to the outer and inner edges of the trellis and to the tower sides. (E).

5. Sawing off exterior lath ends.Place the backsaw across an overhanging lath, setting the side of the saw blade flush against the edge of the panel. Cut the lathe with a single, steady backward stroke, applying light pressure to the saw. Take care not to shave or gouge the panel. Trim all of the other overhanging lath ends similarly.

6. Trimming interior lath ends.Place the blade of a wood chisel across one of the protruding lath ends inside the design. Hold the chisel firmly upright and lightly tap the top of the handle with a hammer until the blade cuts cleanly through the lath. Trim other protruding ends similarly.

7. Filling gaps.To conceal a gap where lath strips meet. First place a small glob of vinyl spackling paste on the tip of a putty knife. Carefully force the paste into the gap and draw the knife across the surface to level it. Fill each gap in the same way. Let the spackling paste dry for several hours.

8. Touching up the paint.Using a 1-inch nylon brush, coat the exposed exterior ends of lath with white exterior flat latex paint. Before painting the exposed interior edges or the patches of spackling paste, cover the adjacent parts of the panel with masking tape. Let the paint dry for two to three hours before removing the tape.

9. Mounting the panel.Stack bricks, concrete blocks or scrap lumber against the fence to form a broad, steady platform 8 inches high where you plan to attach the panel. With the aid of a helper, stand the panel on the platform. Use a carpenter’s level to straighten the panel until it is exactly vertical. Then hold the panel in place while your helper drives sixpenny galvanized steel nails into the plywood at the top corners between the lath. Then nail the bottom corners and finally drive nails at 2-foot intervals along each side.

10. Extending horizontal strips along the fence.Approximately 2 inches from each end of a 4-foot-long strip of 1 1/8 –inch lath, start a 7/8 –inch galvanized-steel brad by hammering it partway into the wood. Set the strip on the fence with one end flush against the first angled strip below the tower design of the panel; drive the brad there through the lath and into the fence. Then set the carpenter’s level on top of the other end of the lath. Adjust the lath until it is exactly horizontal before driving in the second brad. Repeat this process to attach all fo the remaining horizontals.

11. Nailing intersecting verticals.Starting at one side of the panel, make tick marks at 1-foot intervals along the top and bottom horizontal lath strips. Align the outside edge of a vertical lath with the set of marks nearest the panes, and bottom strips with 7/8 –inch brads. Do the same with the remaining verticals. Then go back and anchor all of the verticals firmly by driving a brad into each intersection.

August 9, 2018 0 comment
0 FacebookTwitterPinterestEmail
Design

The Circular Saw

by Charles S. May 20, 2018
written by Charles S.

The easiest way to get wood cut to size is to have it sawed at a lumberyard. To avoid this extra expense, however, you may decide to cut the pieces yourself, using a circular saw. An inexpensive, compact and portable circular saw, though designed for rough carpentry, will cut the pieces for many projects with reasonable accuracy.

Tools for outdoor projects: The Circular Saw

The standard circular saw for home use has a 7 ¼ -inch blade that will cut through lumber up to 2 inches thick; for bevels, it tilts to any angle from 45? to 90?. To saw without binding, the motor should develop at least 1 ½ horsepower.

A variety of blades is available for different cutting tasks. Carbide tipped blades, although more expensive, will outlast ordinary steel blades and save money in the long run.

In operating the saw, a firm grip is extremely important. A 7 ¼ -inch model weighs about 10 pounds and seems heavier when used at arm’s length. For the added safety of a two-handed grip, buy a saw that has two handles.

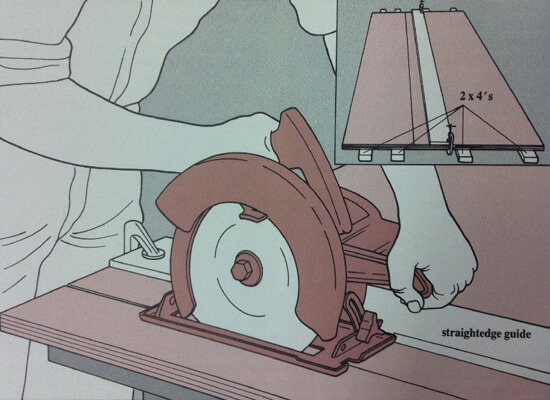
A circular saw can be guided freehand for short cuts; for longer cuts, clamp a guide to the workpiece for accuracy. The manufactured edge of ¼ -inch plywood makes a good, straight guide. Always support lumber from below; without support, the board or panel may crack. Work the saw so that its heavy motor passes over the guide if you are using one.

Many accessories for circular saws are available at hardware stores. A patented metal guide can replace the wood straightedge shown at right. Another guide simplifies rip cutting. A circular saw table, which holds a circular saw underneath it upside down, offers a few advantages of the professional’s tool stability and accuracy at a lower price, but with some loss of versatility.

The Circular Saw: A circular saw.

A circular saw.Driven by a powerful motor, the blade of a circular saw cuts on the upstroke. A spring-activated guard, which slides up into the housing of the saw during operation, drops back down over the blade as the cut is finished. The angle adjustment knob lets the shoe plate be tilted for beveled cuts. The arbor bolt, which holds the blade in place, unscrews so that the blade can be changed.

The Circular Saw: Blade styles.

Blade styles.A fine-toothed plywood blade slices through plywood without splintering it. A crosscut blade’s small teeth tear smoothly across the grain; a ripping blade’s larger teeth, set at a sharper angle, saw with the grain. A combination blade both rips and crosscuts, with small teeth separated by deep indentations. A toothless masonry blade scores brick and stone with its edge of abrasive silicon-carbide grit.

The Circular Saw: Adjusting blade depth.

Adjusting blade depth.Loosen the depth adjustment knob. Lay the shoe plate flat on the wood and push up the blade guard. With one hand, hold up the guard while grasping the blade housing to support the saw body. Keeping the shoe plate flat, raise or lower the saw body and with it the blade until the blade is about ¼ inch below the bottom surface of the board to be cut. Retighten the depth-adjustment knob.

The Circular Saw: Sawing with a straightedge.

Sawing with a straightedge. Clamp a straightedge to the board to be cut so the blade falls on the waste side of the cutting line. Put on goggles before sawing. To cut a large panel of plywood (inset), rest it on the floor, on 2-by-4s. Holding the saw firmly, cut slowly along the straightedge. Do not force the blade it may bind. Keep a steady grip on the saw as it clears the board, and prepare to catch its unsupported weight.

May 20, 2018 0 comment
0 FacebookTwitterPinterestEmail
Indoor Light

GO BEYOND KITCHEN CABINET LED LIGHTING

by Charles S. June 21, 2017
written by Charles S.

Add style to your kitchen cabinets with LED lighting. The versatility of LED products gives you the control to create the look you want. Our LED lighting kits are simple to install so you can design, set up and control your lights quickly and easily.

Interior LED lights for home are perfect for under cabinet lighting, shelves, bar counter lighting, liquor cabinets or even display cases. The possibilities are virtually endless. You don’t have to worry about the quality of your food, wine or collectibles being affected. LED light strips produce little or no heat, so all of your items on display remain safe.

Show off china sets, artworks or collectibles. Highlight the true, vivid colors of your prized possessions with Natural White lighting or jazz things up with a variety of color hues. Multicolored LED lighting provides you with virtually every color, so there are plenty of options to choose from. You can also control the flashing, dimming and brightness with a handheld RGB remote or dimmer switch. Play around with the lighting to create a brilliant glow that makes the objects you are illuminating come alive.

This energy-efficient lighting source is also low maintenance and cost-effective. The energy consumption of LEDs is significantly less than other lighting sources and LED bulbs can last 50,000 hours or more. Save money on your electric bill without sacrificing style.

To learn more about LED lights for your kitchen cabinets, talk to one of our product specialists today. 

June 21, 2017 0 comment
0 FacebookTwitterPinterestEmail
Indoor Light

Why Choose LED Grow Lights?

by Charles S. February 21, 2017
written by Charles S.

LED Growing Lights
When you want the best grow lights, LED lights are your best option. Custom order your LED grow lights specific to your plants needs and grow environment. Blue is good for vegetative and red is good for flowering and budding, you can choose the ratio of the red and blue for a more efficient light specific to your plants needs and environment.

WHY ARE LED’s THE FUTURE OF LIGHTING?

ENVIRONMENTALLY FRIENDLY – Up to 80% more enery efficient than traditional lighting
MORE ENERGY EFFICENT THAN HIDs.
MONEY SAVING – Lower monthly energy bills and save as much as 40%
LAST LONGER-No expensive bulbs to replace
VERSATILE – Can be used with any indoor growing method – hydroponics, aeroponics, and soil
DISCREET – No thermal footprint – undetectable
MONEY SAVING – No wasted energy or extra cooling equipment needed
REFLECTIVE FINISH- Promotes uniform coverage and ensures maximum light delivery
SAFE TO OPERATE – No risk of fire or exploding bulbs. Cool to the touch and safe for children
LIGHTWEIGHT – .5 lbs – no ballast required
SHOCK and VIBRATION- Resistant to drops that would normally break traditional light bulbs
LAST LONGER- 50,000 hour life cycle
THREE YEAR WARRANTY!

**Please allow 30 days for any custom order LED plant lights**.

All Blue Vegetative Efficient LED growlight products are inexpensive and effective. By using blue LED grow lights during the vegetative period you get better efficiency by only giving your plants the desired spectrum needed for photosynthesis.

Full cycle efficient LED growlight products emit very little heat and no burns when close to the plants. Utilize full cycle led grow lights. LED lights will last for the entire life of your plants, save electricity, less heat, very efficient.

Efficient flowering LED growing lights. 5:2:1:1:1 Enhanced Spectrum Red/Red/Blue/Orange/White – Utilize the specific colors your plants absorb during flowering.

LED plant lights are available in various wattage. By having LEDs that emit light with wavelengths close to chlorophyl’s absorption peaks LED grow lights are able to grow more efficiently than full spectrum lights. LED grow lights are nature friendly from every possible stand point. First of all, as you may already know, LED grow lights and LED technology in general is highly energy efficient. Moreover, LED grow lights do not contain any heavy metals whatsoever. Traditional grow lights, on the other hand, contain mercury and other heavy metals. Another advantage which is found useful by many of its users is the immediate start. As opposed to say HID lamps that take one minute or more to start, LED grow lights/lamps start immediately.

Use the online HTML editor tools to compose the content for your website easily.

February 21, 2017 0 comment
0 FacebookTwitterPinterestEmail
Newer Posts
Older Posts

Recent Posts

  • LED High Bay Lights vs. Traditional Lighting: A Comparative Analysis
  • DIY LED Light Colors – Rich and Interesting
  • What Are The Different Types Of Popular Chandelier Designs?
  • The Four Common Types of Outdoor Lighting
  • 5 Parts Of A Solar Street Light With Motion Sensors

Recent Comments

    Copyright 2021. All Rights Reserved.


    Back To Top
    bloglightmag.com
    • Home
    • Design
    • Light
    • Resource
    • About Us
    • Guest Post